.png)
Pumpkin Mosaic Tutorial
- Kristy Hamilton
- Sep 15, 2023
- 3 min read
Fall is in the air, and I could not be happier! Fall is certainly my favorite season...give me all the apples, pumpkins and crunchy leaves, please!
Today, I have an easy pumpkin balloon mosaic tutorial for you! This would be a fun way to elevate your next fall gathering!
Let's get started!
First you'll need to gather your materials. You'll need:
-2, 22"x48" foam boards (I got mine from Hobby Lobby)
-pumpkin template (I purchased from Etsy)
-scissors
-ruler (lol, I used mine from my favorite pumpkin patch :)
-pencil
-tape
-x-acto knife
-hot glue gun
-large self-healing cutting mat (or your can use scrap plywood)
-optional glue dots or masking tape

I purchased the pumpkin template from MadamMosaicTemplates on Etsy. There were several vendors on Etsy, but I really liked the look of this one. Plus, it came with templates for mosaics ranging from 2 ft to 5 ft.
All you have to do is print out the pages, arrange in order, and tape together. Next, you cut out your pumpkin shape. Easy-peasy!


Time to trace your template onto your foam board with your pencil. Since I chose the 3ft template, my stem did not fit on my foam board. I just cut off that part and traced it separately on the board, It will easily be attached with hot glue later!

It's time to cut out your pumpkin! I used my large self-healing mat, but you could use a smaller one and just move the mat while cutting. You could even use a scrap piece of plywood! Once I cut out the pumpkin and the stem, I glued the stem back on top.

Next up, you're going to cut strips from another sheet of foam board to start making the sides of your mosaic. Let's get 3D!
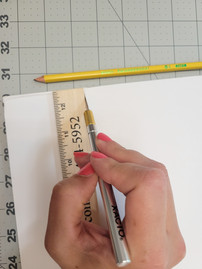
Take your ruler and pencil and put little hash marks 3 inches from the bottom of the board. Do this all the way down the poster board. Next, line up your ruler on the hash marks and cut the strip with your x-acto knife, moving your ruler down as you go. I cut 5 strips for my 3 ft pumpkin.
Next, you're going to score each strip to make it bendy. Line up your ruler and cut partly through the board (just the top paper). I eye-balled this, but they ended up being about an inch apart. Do this with all 5 strips. You may need to cut some of the strips down to fit the outline of your pumpkin.


You're ready to glue on your strips! Add some glue along the bottom of your strip and attach to the side of your pumpkin cut-out. The cut side will face outward, except for the stem. I went both ways with the scoured side to fit the shape of the stem. You'll need to attach your glue to the bottom of the inner strips.


And voila! Your pumpkin mosaic is ready for balloons! This mosaic stands upright on its own, but your could always add a kickstand on the back to make sure it doesn't fall over.

Now here comes the fun part! Let's add the balloons! I ended up using a burnt orange color for the body and a sage color for the stem but you can use any colors you would like. I also arranged them in a bit of a pattern, which is also optional. I used 4 sizes, 6 in, 5 in, 4 in and 3 in. You may either use your glue gun on low heat to attach the balloons to the mosaic or your can use glue dots or masking tape.

And there ya have it; your lovely pumpkin mosaic is ready to make it's debut at your next fall party! I hope you enjoyed this fun tutorial. If you don't want to DIY your mosaic, let Social Butterfly create one for you. We can create any letter, number, or specialty shape and add balloons to fit your theme!
Elevate Your Soiree!
Until next time,
Kristy

Comments